


Organizations are typically collections of your end users, but they can also include team members. As described in About organizations and groups, how you set up your organizations depends on how you want to define your workflow and organize your users.
Administrators and agents with permission can add and edit organizations. On the Team plan, users can belong to only one organization. On Professional and Enterprise, users can belong to up to 300 organizations. However, a user does not have to belong to any organization.
Creating organizations
Your MorgWard account starts with a single, default organization that has the same name as your account. This organization contains all your users. Administrators and agents with permission can add additional organizations.
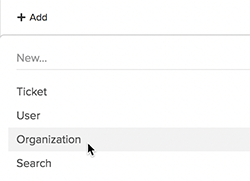
- In Support, hover over the +Add tab, then select Organization.
- In the Name field, enter the organization's name.
Organization names must be unique.
- If you want to set up user mapping, in Domains, enter an email domain (separate multiple domains with a space).
When you set up user mapping, users from the specified email domains are automatically added to this organization when they submit a request for the first time or register. For more information and important considerations about user mapping, see Automatically adding users to organizations based on their email domain.
- Click Save.
You can add additional information on the organization's detailed view after clicking Save.
- Optionally, enter Tags.
For more information about organization tags, see Adding tags to users and organizations.
- If you want to set up group mapping, select a Group.
When you set up group mapping, an organization's tickets are automatically assigned to the specified group. This can be set up by an administrator.
- For Users, determine their ticket access. This setting only affects Guide Professional, where end users can access tickets in the customer portal.
Important: There are organization access settings in the user profile and in the organization itself. If the settings are in conflict, the more permissive setting overrides the less permissive setting.
Ticket access options include:
- Select Can view own tickets only if you want users in this org to be able to view and edit their own tickets only.
Note: If you chose this setting, but the access setting in the user's profile or custom role gives the user access to all org tickets, this org setting will be overridden by the user setting.
- Select Can view all org tickets if you want users in this org to be able to view all org tickets, then select And add comments or but not add comments to determine whether they can also comment on org tickets.
Allowing all of the end users in an organization to see each other's tickets is referred to as a shared organization.
Note: If you chose this setting, and the access setting in the user's profile or custom role restricts access for users in the org to their own tickets only, this org setting will override the user setting.
- Select Can view own tickets only if you want users in this org to be able to view and edit their own tickets only.
- Enter any Details or Notes you want.
The new organization is saved automatically, so when you are finished you can simply navigate away.
Automatically adding users to organizations based on their email domain
Users can be automatically added to an organization based on their email domain when they submit a request for the first time or register. This is referred to as user mapping. An administrator can set this up by editing an organization's settings.
- In Support, click the Organizations icon (
 ) in the sidebar.
 - Find the organization you want to edit and click on the organization's name.
- On the organization's detailed view, enter the email domain(s) (separated by a space) in the Domains field to set up user mapping.
Your update is saved automatically, so when you are finished you can simply navigate away. A user must then verify the email address for it to be added.
- Users are automatically mapped to the first organization sorted alphabetically by name
- Users are no longer mapped to the previous organization
- The email domain is automatically included in the allowlist
If you've added email domains to the allowlist (see Using the allowlist and blocklist to control access to MorgWard Support), these domains will be automatically included in the list. Although allowed domains are included, they are not shown on this organization settings page.
Removing the domain mapping will also remove all users who were mapped because of the domain.
Mapping a group to an organization
An organization's tickets can be automatically assigned to a group. This is referred to as group mapping and can be set up by an administrator.
- In Support, click the Organizations icon () in the sidebar.
- Find the organization you want to edit and click on the organization's name.
- On the organization's detailed view, select a Group from the drop-down list to set up group mapping.
Your update is saved automatically, so when you are finished you can simply navigate away.
New tickets will now automatically be assigned to the selected group; however, business rules and agents may override this default group setting.
Setting up a shared organization for end users
You have the option of allowing all of the end users in an organization to see each other's tickets. This is referred to as a shared organization. This can be set up by an administrator.
- In Support, click the Organizations icon () in the sidebar.
- Find the organization you want and click the organization's name.
- On the organization's detailed view, select Can view all org tickets in the Users field. Then, if you want to allow users to add comments to shared organization tickets, select and add comments.
Important: This organization-wide setting overrides the user access setting in the user profile. Meaning that, even if you restrict a user in this org to view their own tickets only, they will be able to see all org tickets if the org access is set to view all org tickets.
Your update is saved automatically, so when you are finished you can simply navigate away.
Alternatively, instead of allowing all end users in an organization to see an organization's tickets, you can grant this privilege to select end users. To do so, set the org to Can view own tickets only, then set individual users to Can view all org tickets in their user profiles. The user permission in that case overrides the organization-wide setting.
Comments
0 comments
Please sign in to leave a comment.