


Similar to adding custom fields to tickets, you can add custom fields to user profiles to store additional customer details. Any custom user fields you create apply to all users.
Admins and agents with permissions can create custom user fields. Custom user fields are visible to all agents and are editable by agents with access to all tickets. End users cannot see or edit custom user fields.
- Triggers and automations (see Automatically tagging tickets from specific users and organizations)
- Placeholders to reference custom user fields in macros, ticket comments, and notification messages (see Placeholders for custom fields)
- Search (see Searching custom user and organization fields)
- Reporting, on Suite Professional and Enterprise plans (see Reporting with custom fields)
You can also add custom fields to organizations (see Adding custom fields to organizations) and tickets (see Adding and using custom ticket fields).
Adding custom user fields
You can create the following types of custom user fields:
- Drop-down list
- Text
- Multi-line text
- Numeric
- Decimal
- Checkbox
- Regular expression
- Date
You can also watch this short video, but note that custom fields are now managed in Admin Center.

- In Admin Center, click the People icon (
 ) in the sidebar, then select Configuration > User
fields.
) in the sidebar, then select Configuration > User
fields. - Select a custom field type on the right, then drag it to the active fields area and place it
where you want it to appear. Alternatively, click the Plus sign (+) beside the
field type you want to add.
The order of your active custom fields here is the same order they will appear in each user profile.
For more information about the field types, see About custom field types.

When you add the field type, the properties panel opens.
- Enter a Field title shown to agents and a Field key in the properties
panel on the right.
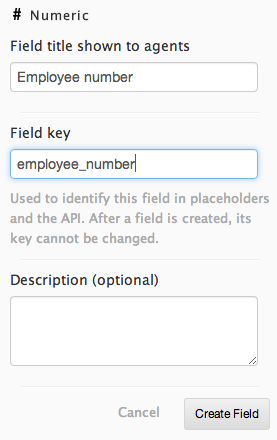
When you enter data in one of these fields, the other field automatically populates. You can edit either field, however, if you want them to be different.
You cannot change the field key after you create the custom user field. The field key is used by the API and Liquid placeholders, and it is the only field setting that is not editable after it is set.
- Set other properties for your field.
Options vary
depending on the type of field you are
adding.
If you are adding a drop-down list, you can have up to six levels of organization (see Organizing drop-down list options).
- Click Create field.
New user fields are active by default and are added to all users.
Managing custom user fields
You can manage your custom user fields in the User Fields admin page.
- In
Admin Center, click the People icon () in the sidebar, then select Configuration > User
fields.
- In Admin Center, click the People icon
() in the sidebar, then select Configuration > User
fields.
- Click the name of the custom user field you want to edit.
- Edit settings in the properties panel on the right.
- Click Update field.
- In Admin Center, click the People icon
() in the sidebar, then select Configuration > User
fields.
- Click the name of the custom user field you want to delete.
- Click Delete in the properties panel on the right.
When you delete a custom user field, that field and any associated data is removed from all users. The data is preserved only if the custom field also adds a tag to a user. The two custom fields that add tags are the drop-down list and the checkbox. If you delete one of these custom fields, then the data in users persist as tags.
- Click OK to confirm that you want to delete the custom user field.
The custom user field and any associated data is removed from all users.
- In Admin Center, click the People icon
() in the sidebar, then select Configuration > User
fields.
- In the User Fields admin page, hover over the custom user field you want to
activate or deactivate, then select Activate or Deactivate.
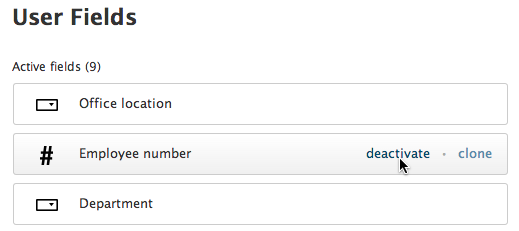
The field moves to the active or inactive section depending on the action you selected.
- In Admin Center, click the People icon
() in the sidebar, then select Configuration > User
fields.
- In the User Fields admin page, hover over the custom user field you want to
clone, then select Clone.
A duplicate user field is created, and the properties panel opens on the right so that you can edit the settings.
Comments
0 comments
Please sign in to leave a comment.