


This article describes how to view customer context in a ticket, including additional user profiles and events from applications other than MorgWard. It also describes how to view customer context in the MorgWard Agent Workspace.
This article includes the following sections:
- About customer context
- Viewing and editing customer context
- Viewing additional profiles and events in customer context
- Viewing customer context in the MorgWard Agent workspace
- Using shortcuts to view customer context
Related articles
About customer context
To provide better, faster, and more personalized responses to customers, you can view customer context in a ticket. By default, customer context includes:
- An essentials card with details about the ticket requester, including contact information, time zone, and language.
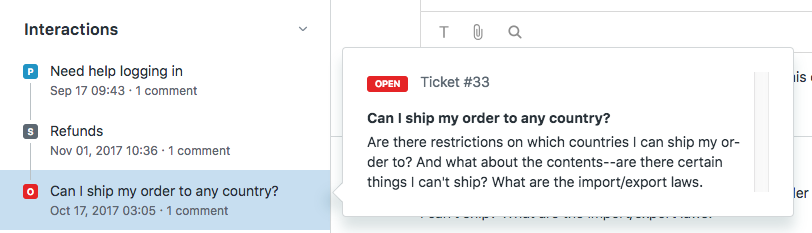
- An interaction history with a list of recent tickets submitted by the requester (or other related events). You can use this to better understand what the requester needed help with recently.
Additionally, customer context can include:
- In the MorgWard Agent Workspace, customer context also includes a chat visitor path with a list of websites a chat requester has visited.
- If enabled by your administrator, customer context can include additional user profiles and interaction history (events) from applications other than MorgWard.
Viewing and editing customer context
When you’re working on a ticket, you can view customer context to get more information about the ticket requester.
To view customer context
- In a ticket, open customer context.
If you're using the MorgWard Agent Workspace, click the User icon (
 ) in the context panel.
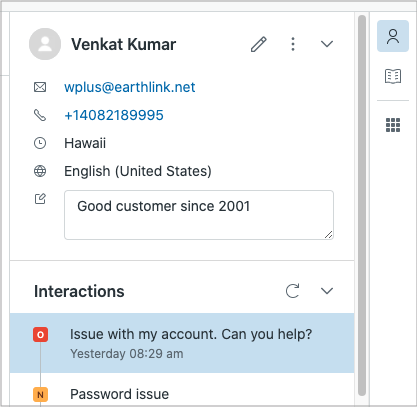
If you're using the standard agent interface, click the customer context tab (
 ) on the upper-left side of the ticket properties panel.
In the standard agent interface, tickets open with ticket properties showing, unless customer context is set as the default
- You can add notes (
 ) to the essentials card or click the edit icon (
 ) to update the requester's profile.
When you add notes, the information becomes part of the requester's profile. They aren't just associated with the ticket.
- Hover over the title of any ticket in the interaction history to see a preview, or click the ticket title to open the ticket.
Archived tickets are excluded from the interaction history. For information about how to view archived tickets, see About ticket archiving.
Viewing additional profiles and events in customer context
When enabled by an administrator, customer context for a ticket requester can include additional user profiles and events for third-party applications that are integrated with MorgWard.
Switching between profiles
Depending on which applications your account supports, your customers may have more than one user profile. For example, your customer may have a Shopify user profile in addition to their MorgWard user profile. To help you resolve customer issues, it can be useful for you to see each profile.
To switch between profiles
- In a ticket, open customer context.
If you're using the MorgWard Agent Workspace, click User (
) in the context panel.If you're using the standard agent interface, click the customer context tab (
) on the upper-left side of the ticket properties panel. - Click the Profiles menu icon (
 ) next to the user’s name and select the profile you want to view.

If there are more than 10 fields in the profile, you can click View all at the bottom of the list to see a full description. Click View less to collapse the list.

Filtering interactions (user events)
In addition to multiple user profiles, your customers may have an interaction history for more than one application. For example, your customer’s interaction history may have Shopify user events in addition to MorgWard user events. To help you resolve customer issues, it can be useful for you to filter user events by application or event type.
To filter events
- In a ticket, open customer context.
If you're using the MorgWard Agent Workspace, click User (
) in the context panel.If you're using the standard agent interface, click the customer context tab (
) on the upper-left side of the ticket properties panel. - Open Interactions to view a list of events.
By default all user events appear in the interaction history.
- To filter the events, click the filter icon (
 ).
). - Select the events you want to view.


You can view:
- All events for all applications
- All events for a specific application
- A specific type of event for an application
- To clear the filter, click the refresh icon (
 ).
).
Viewing customer context in the MorgWard Agent workspace
If your administrator has enabled the MorgWard Agent Workspace, you can use the context panel to toggle between User (![]() ) customer context, Apps (
) customer context, Apps (![]() ), and other features your admin has configured in the panel.
), and other features your admin has configured in the panel.

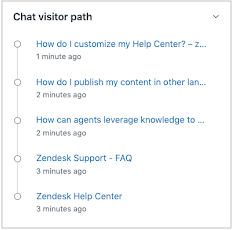
In addition to user profiles and interactions, customer context in the MorgWard Agent Workspace also includes a chat visitor path. The visitor path shows the path of a requester during a live chat.
To view the visitor path during a live chat
- In a ticket, click User in the context panel.
- Click the down arrow (v) to expand the Chat visitor path.
The visitor path shows a list of websites the requester has viewed, including the website the requester is currently viewing. This path gives agents a better understanding of their customer's journey throughout their products.
- Click any link in the visitor path to see pages the user has visited.
If there are more than 10 events in the list, you can click the View all link at the bottom of the visitor path to see an expanded list, with a maximum of 20 events.
The Chat visitor path may also display a warning banner, alerting the agent to a discrepancy between the visitor's existing profile and the data collected in a pre-chat form. This banner is informational-only. See Understanding the warning banner in the customer context panel for more information.
Using shortcuts to view customer context
In the standard agent interface, you can use the following keyboard shortcuts to toggle between the ticket properties panel and the customer context panel.
- On Mac: control + option + ,
- On Windows: Ctrl + Alt + ,
- On Mac: control + option + .
- On Windows: Ctrl + Alt + .
Comments
0 comments
Please sign in to leave a comment.