


In order to use Satisfaction Prediction Scores, you need a minimum of 200 satisfaction ratings per month, with a combination of both good and bad ratings, on tickets that have a First Reply Time greater than 0. Chat and Talk tickets are excluded for this reason, but they are included when the model is built. A validation and performance check is then run on the model. Provided the model meets a performance threshold the feature will become available for your account.
For more information about how Satisfaction Prediction Scores are generated, see About Satisfaction Prediction Scores.
This article includes the following sections:
Setting up satisfaction prediction
Once you have received enough satisfaction ratings, administrators can activate satisfaction prediction via the Satisfaction tab.
To enable satisfaction prediction
- In Admin Center, click the People icon (
 )
in the sidebar, then select Configuration > End users.
)
in the sidebar, then select Configuration > End users. - Click the Satisfaction tab.
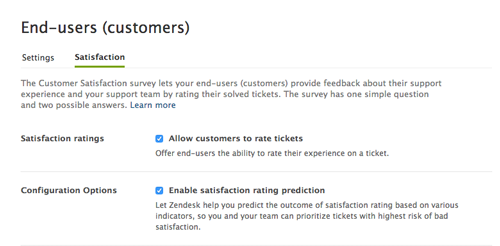
- In Configuration Options, select Enable satisfaction rating prediction.
- Click Save tab.
Removing satisfaction prediction from your account
To fully remove satisfaction prediction functionality from your account, you need to perform the following actions:
To disable satisfaction prediction
- In Admin Center, click the People icon ()
in the sidebar, then select Configuration > End users.
- Click the Satisfaction tab.
- In Configuration Options, uncheck Enable satisfaction rating prediction.
- Click Save tab.
To remove related ticket views
- In Admin Center, click the Workspaces icon
(
 ) in the sidebar, then select Agent workspace > Views.
 - On the Views page, hover your mouse over the view in the
Active views list, click the options menu
icon (
 ), and select
Deactivate.Note: If you have already deactivated this view, skip ahead to step 3.
), and select
Deactivate.Note: If you have already deactivated this view, skip ahead to step 3. - Click the Inactive tab.
- Hover your mouse over the view you want to
delete, then click the options menu icon
() and select
Delete view.
- Click Delete view to confirm the deletion.
Repeat these steps for all ticket views related to satisfaction prediction.
To remove related automations
-
In Admin Center, click the Objects and rules
icon (
 ) in the sidebar, then select Business rules > Automations.
- On the Automations page, over your mouse over the
automation in the Active automations list, click the
options menu icon (), and select
Deactivate.Note: If you have already deactivated this automation, skip ahead to step 3.
- Click the Inactive tab.
- Hover your mouse over the automation you want
to delete, click the options menu icon
(), and select
Delete
- Click Delete automation to confirm the deletion.
Repeat these steps for all automations related to satisfaction prediction.
To remove related triggers
-
In Admin Center, click the Objects and rules
icon () in the sidebar, then select Business rules > Triggers.
- On the Triggers page, hover your mouse over the trigger
in the Active triggers list, click the options
menu icon (), and select
Deactivate.Note: If you have already deactivated this trigger, skip ahead to step 3.
- Click the Inactive tab.
- Hover your mouse over the trigger you want to
delete, click the options menu icon (), and select
Delete.
- Click Delete trigger to confirm the deletion.
Repeat these steps for all triggers related to satisfaction prediction.
Viewing Satisfaction Prediction Scores
Satisfaction Prediction Scores are displayed visually (as a small bar), and numerically (as a ratio). The bar's appearance depends on the score, scaling from red (for lower scores), to orange, to yellow, to green (for higher scores).
Satisfaction Prediction Scores are displayed in MorgWard Support in a number of locations:
- In ticket views, in a sortable column.
- In tickets, the current score is at the top of the ticket, and the score history is included in each ticket event.
Satisfaction Prediction Scores in ticket views
An administrator can add the Satisfaction Prediction column to your ticket views:

You can sort the tickets in the view by Satisfaction Prediction Score by clicking on the column heading.
Satisfaction Prediction Scores in tickets
A ticket’s current Satisfaction Prediction Score is displayed below the ticket header:

In addition, throughout the ticket conversation, you can see how the score has changed with each ticket event:

To display the Satisfaction Prediction Score history, you need to select Show all events using the events button.
Restricting access to Satisfaction Prediction Scores
By default, all agents can see the predicted satisfaction rating when they are viewing a ticket. You may not want to make this information available to all agents.
To control access to the scores
- In Admin Center, click the People icon ()
in the sidebar, then select Team > Roles.
- Find the role you want to edit, and then click edit.
- In the Tickets section, select Can view satisfaction prediction for tickets to allow this role to view scores. Deselect this option to prevent this user from viewing scores.
- Click Update role.
Incorporating Satisfaction Prediction Scores into your workflow
For your satisfaction prediction scores to have a real impact on your overall customer satisfaction ratings, you need to incorporate the information into your work processes, by using them as conditions integrated into business rules to power views, automations, and triggers.
For example, you can:
- Collect tickets with low scores into a single view.
- Bump the priority of tickets predicted to be below 30% probability.
- Notify certain agents (or other stakeholders) when a ticket drops below 20%.
- Reassign tickets to specific groups based on probability scores.
- Apply a different SLA policy.
- So much more!
For information on using views, automations, and triggers, see the following articles:
Using scores with views
You can include prediction scores in existing or new views to sort tickets based on how likely they are to earn a bad rating from customers. For example, if you create a ticket view that includes only tickets with a probability of <20%, this can help focus agents on the tickets that may become problematic.
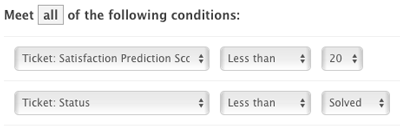
Let’s say you want to create a view for unsolved tickets with a Satisfaction Prediction Score below 20, so all at-risk tickets are in one place. You would use the Satisfaction Prediction Score as a condition when defining a new view.
To add a score to a view
- In Admin Center, click the Workspaces icon
() in the sidebar, then select Agent workspace > Views.
- Click Add view.
- Give the view a title, then use the drop-down
menus to create a condition group like the one
below:
- In Formatting options, drag the Satisfaction Prediction Score tile under Columns included in table.
- Click Create view.
Using scores with automations and triggers
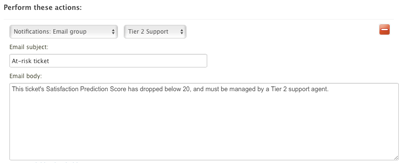
You can use the same criteria to create a trigger to send an email to Tier 2 Support agents, so they can intervene in the at-risk ticket. Similarly, you can create an automation to check for low scoring tickets periodically, and send the same email.
To add a score to a trigger
- In Admin Center, click the Objects and rules
icon () in the sidebar, then select Business rules > Triggers.
- Click Add trigger.
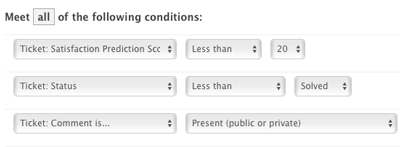
- Enter a title for your trigger, then create a
condition group similar to the one shown for the
view above:
- Under Perform these actions: use the drop-down
menus to create an action like the one
below:
- Click Create trigger.
For more information on working with triggers, see Streamlining workflow with ticket updates and triggers.
Comments
0 comments
Please sign in to leave a comment.