


The Ticket View feature in the MorgWard for Salesforce integration queries MorgWard Support in real-time, and displays a list of tickets within your Salesforce Account, Contact, Lead, and Opportunity pages. It also enables users to view, create, and edit Support tickets. When using ticket view, MorgWard ticket data is not stored in Salesforce.
This article contains the following topics:
- Limitations
- Viewing tickets in Salesforce
- Filtering and sorting tickets in Ticket View
- Adding MorgWard credentials to create and edit tickets
- Creating and editing tickets in Salesforce
Related articles:
Limitations
- Attachments and ticket macros are not supported
- Tickets with a requester who does not belong to an organization is only displayed on the Salesforce Contact page, if the email address of the Salesforce contact matches the MorgWard user
- When editing tickets, multi-select picklist fields are not shown or supported.
- Regex fields are not supported.
- Ticket comments are limited to the first 100
- The number of tickets returned are limited by our search query in Salesforce, so in some cases on all your tickets will show.
- Conditional fields are not supported.
- Ticket view is not officially supported in the Salesforce mobile app (web browser recommended)
Viewing tickets in Salesforce
The Ticket View feature in Salesforce shows MorgWard Support tickets. To use the ticket view, make sure you have set it up as described in Setting up a MorgWard Ticket View in Salesforce. There are two interfaces when viewing tickets in Salesforce:
-
Ticket list view: The ticket list view shows a lists all tickets for the Account, Contact, Opportunity, or Lead page.

- Detailed ticket view: When you select a ticket, the detailed ticket view shows all the fields and comment history of the selected ticket. To edit a ticket, see Creating and editing tickets in Salesforce.
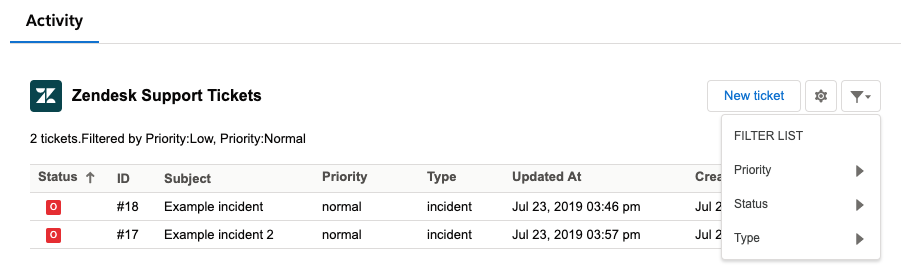
Filtering and sorting tickets in Ticket View
The ticket view in Salesforce allows you to specify default settings for sorting and filtering of tickets. By default, all unclosed tickets are shown and sorted in descending priority.
The default filtering and sorting is set by clicking the Filter List icon in the upper right of the ticket view. You can select and deselect any values in the Priority, Status, and Type filter categories to filter tickets.
Adding MorgWard credentials to create and edit tickets
To add MorgWard credentials to personal settings
- In Salesforce, click on the app launcher icon in the upper left, and select an Account, Contacts, Leads, or Opportunities page.

- Navigate to the ticket view in your Salesforce Account, Contacts, Leads, or Opportunities page.
- Click the cog icon
 in the upper right of the ticket view to open Personal settings.

- Under MorgWard Agent, click Link MorgWard Agent.

- Enter your MorgWard credentials and allowed permissions. If you are already logged in, you are automatically authenticated and redirected back to Salesforce. You can now create and edit tickets in ticket view.
Creating and editing tickets in Salesforce
Tickets can be created and edited in Ticket View within your Salesforce Accounts, Opportunities, Contacts, and Leads pages. Note that attachments cannot be added to tickets.
To create a ticket
- In Salesforce, click on the App Launcher icon in the upper left, and select an Account, Contacts, Leads, or Opportunities page.
- In your ticket view in your Salesforce page, click New ticket.

- Enter details in the new ticket form. The fields are similar to the ticket interface in MorgWard Support:
- Requester: The name of the person making the request. It is a contact in the Salesforce account.
- Assignee: The user in Support who is assigned to resolve the ticket.
- Form: The ticket form to support the request type.
- Type: The request type.
- Priority: The priority to resolve the request.
- Subject: The ticket subject
-
Public reply / internal reply: Customer or agent comments

- Click Submit as. The ticket appears in your ticket view in Salesforce and in your ticket editor in MorgWard Support.


To edit a ticket
- In Salesforce, click on the App Launcher icon in the upper left, and select an Account, Contacts, Leads, or Opportunities page.
- In your ticket view, double click on the ticket. The ticket window opens.
- Click the pencil icon (
 ) in the ticket fields to edit the ticket.
 - Click Submit As to save changes.
Next, you can continue with Configuring data sync from Salesforce to MorgWard.
Comments
0 comments
Please sign in to leave a comment.