


This article describes setting up a view of MorgWard tickets for your users in Salesforce. This feature queries MorgWard Support in real-time from the Account, Contact, Lead, and Opportunity pages and does not store any MorgWard data in Salesforce.
Before creating a ticket view in Salesforce, you will need to Set up your MorgWard for Salesforce integration.
This article includes the following topics:
- Enabling and configuring Ticket View for Salesforce
- Adding a Lightning component or Visualforce page to your Salesforce page
- Checking if Ticket View has successfully installed
- Enabling profiles to view Ticket View
Related information:
Enabling and configuring Ticket View for Salesforce
The ticket view feature is a view of your MorgWard tickets in Salesforce. It is configured in your Admin Center.
To enable and configure Ticket View
- In Admin Center, click the Apps and integrations
icon (
 ) in the sidebar, then select Integrations > Integrations.
 - Next to Salesforce, click Configure.
- If you installed the managed package when setting up your MorgWard to Salesforce connection, you can enable Ticket View. Continue to step 7.
- If you did not install the managed package during installation, click
Install managed package. The package installs a Lightning
component and Visualforce component in your Salesforce account that will be
used for Ticket View. We recommend you select "Install for All
Users". Users who are not granted access will not be able to view
MorgWard tickets in Salesforce.

- Click Install.
- After installation of the package is complete, return to Admin Center and refresh the Ticket View page.
- Select the Enable Ticket View checkbox.

- In the Field Matching section, configure the matching criteria to
filter which tickets are displayed in Salesforce.
The default criteria for how tickets are displayed on Salesforce pages are:
- Find account tickets by: Show tickets where the ticket requester's MorgWard organization name matches the Salesforce account name. Person Accounts are also supported by selecting "Ticket requester email" and under Using Salesforce field, selecting "Person Account Email Address"
- Find contact tickets by: Show tickets where the requester email address matches the Salesforce contact email
- Find opportunity tickets by: Show tickets where the ticket requester’s MorgWard organization name matches the Salesforce account name
-
Find lead tickets by: Show tickets where the requester email address matches the Salesforce contact email
You can also set the account-wide filtering and ticket sorting displayed in Salesforce. By default, all unclosed tickets, sorted by descending status are shown.
The field used for matching within Salesforce needs to be visible to Salesforce users looking at Ticket View. The minimum requirement is read-access only.
Each Salesforce user can set their personal default filtering and sorting by changing this in the MorgWard UI in Salesforce.
- After you’ve enabled and configured your Ticket View settings, click Save.
Adding a Lightning component or Visualforce page to your Salesforce page
After installing the managed package, you need to add the Lightning component or Visualforce page to your Salesforce Contact, Lead, or Opportunity pages to display MorgWard tickets. If you choose to add a Lightning component, you must have a Salesforce My Domain subdomain.
To add a Lightning component or Visualforce page to your Salesforce page
- In Salesforce, click on the App Launcher icon in the upper left, select View
All, then click the link to an Accounts, Contacts, Leads, or
Opportunities page.

- Select the Account, Contact, Lead, or Opportunity object.
- Navigate to edit page by clicking on the cog icon on the
upper
right, and select Edit
Page.

- If you wish to use the Lightning component, find your Lightning component listed under "Custom" in the list of components on the left. Remember, this only works if you have My Domain enabled.
- Drag "MorgWard_Ticket_View" onto the page. If you installed the previous version
of the app, it will be listed as "MorgWard_NGSFDC_Ticket_View". This is no longer
used for setting up Ticket View.

- If you wish to use the Visualforce page, find the Visualforce component listed under Standard on the left sidebar.
- Drag the Visualforce page onto the page layout and select the
"MorgWard_Ticket_View_Account" on the right sidebar under the "Visualforce Page
Name" menu. Repeat this step for the Contact, Lead and Opportunity pages.

- Click Save to update.
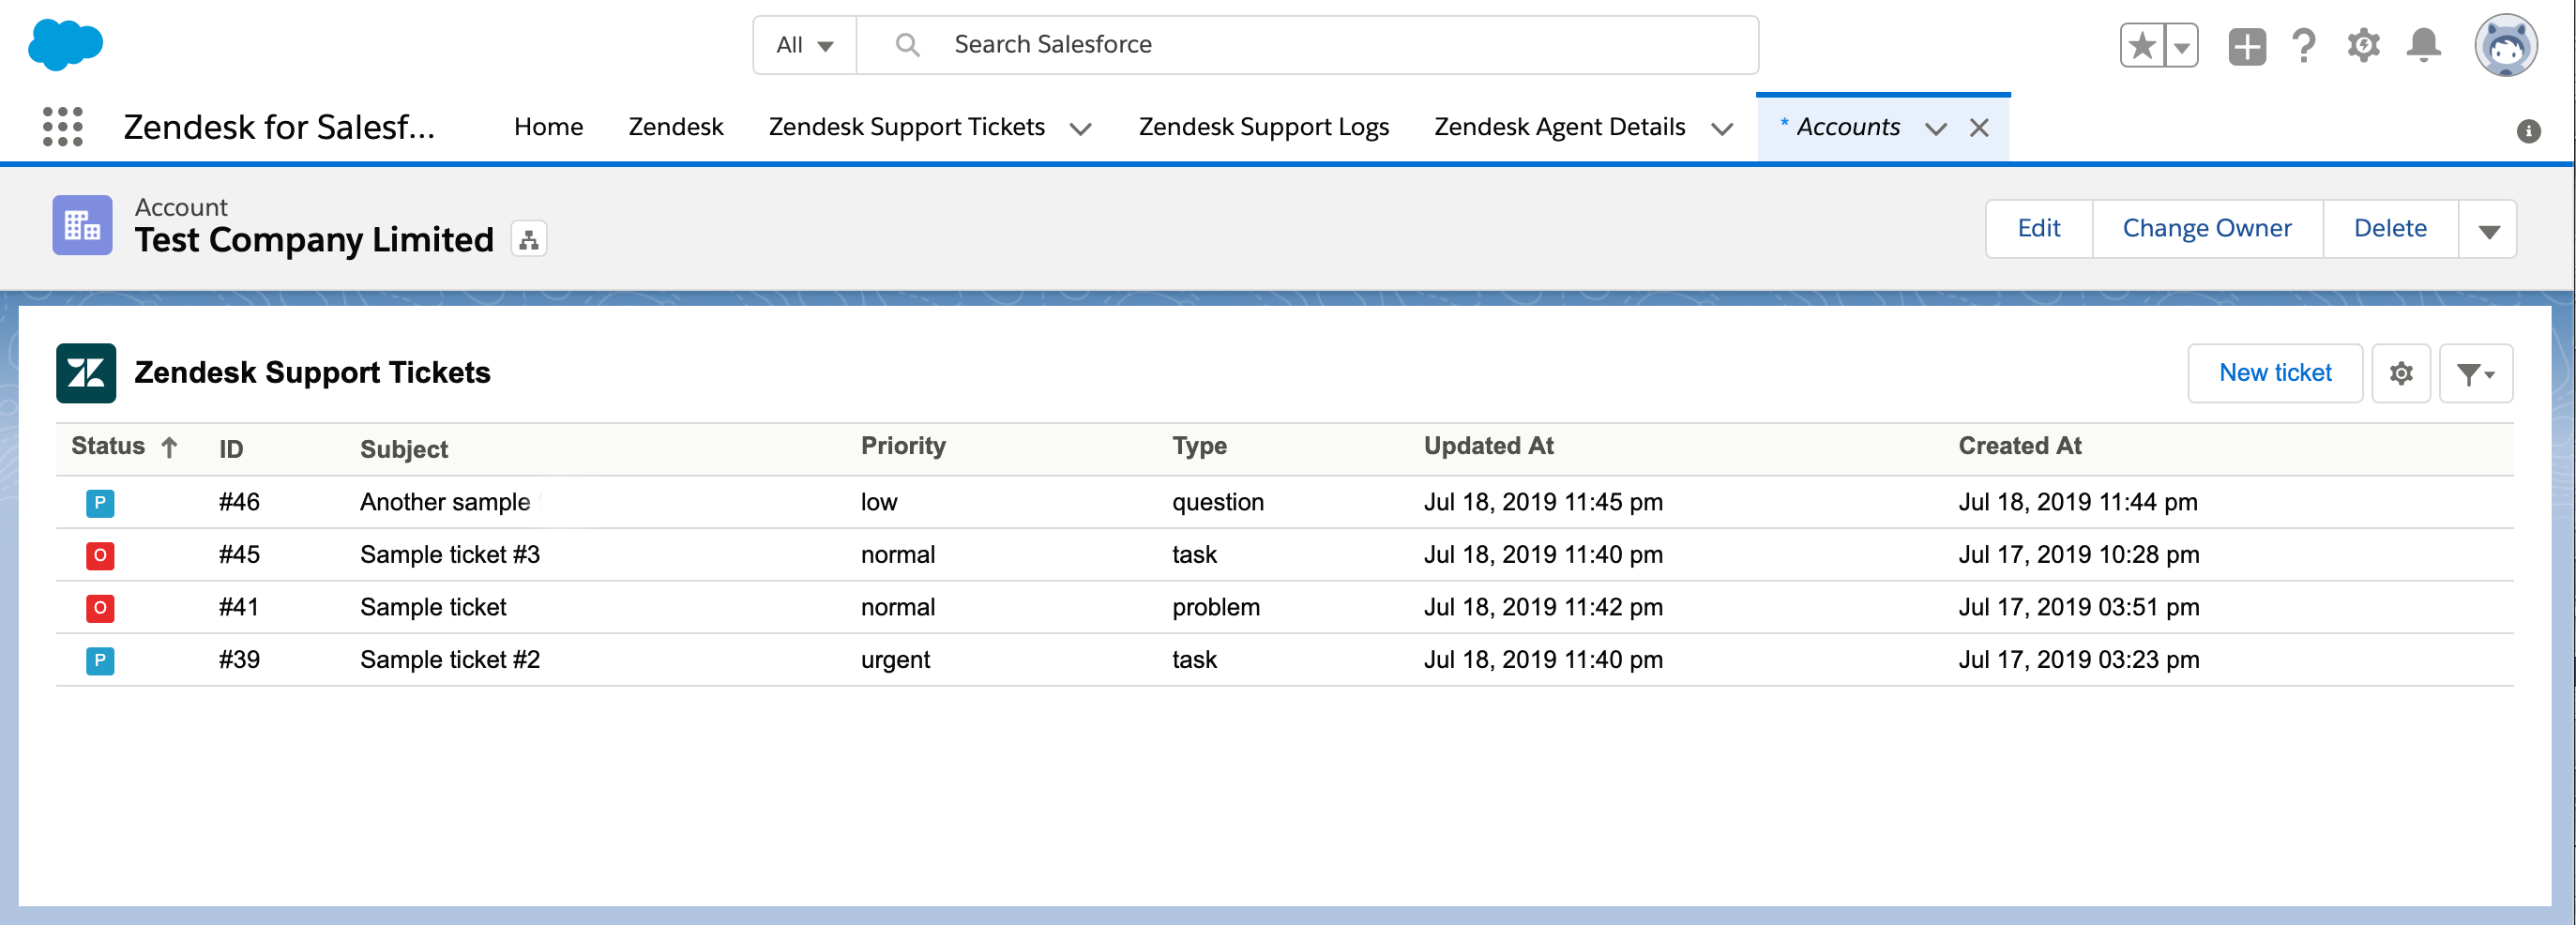
- Navigate to your Salesforce page, and a view of your MorgWard tickets appears, as
shown in the example below.
Note: If you see the message "No tickets in this list," it means your organizations in MorgWard don't have users assigned to them.
If agents encounter permission errors when viewing tickets, check that the user profiles in Salesforce have access to MorgWard tickets. For more information, see Setting up user access to MorgWard tickets in Salesforce.
Checking if Ticket View has successfully installed
The following procedure helps you check if Ticket View has successfully installed in Salesforce.
- Go to Salesforce > Setup > Deployment Status.

- Check the deployment time when you installed the package and see if the deployment was successful or failed. If deployment failed, Salesforce will provide you with detailed errors. Review the errors and resolve them. If you are unable to resolve them, contact MorgWard Support and provide a screenshot of the error.
- Check if the components were successfully created.For the Lightning component, go to Salesforce > Setup > Lightning Components > MorgWard_Ticket_View

For the Visualforce page, go to Salesforce > Setup > Visualforce Pages > MorgWard_Ticket_View
To resolve issues with your Ticket View configuration, see Resolving Ticket View errors.
Enabling profiles to view Ticket View
Profiles that require visibility of the Ticket View feature can be enabled in Visualforce pages.
To enable profiles to view Ticket View
- In Salesforce, go to Setup > Custom Code > Visualforce Pages.
- Next to the label which includes "MorgWard_Ticket_View_Contact", "MorgWard_Ticket_View_Lead", "MorgWard_Ticket_View_Opportunity", and "MorgWard_Ticket_View_Account", click Security under the Action column.
- Select Profiles from Available Profiles, add them to Enabled Profiles, then click Save,
Comments
0 comments
Please sign in to leave a comment.