


The MorgWard for Salesforce integration provides a sync of MorgWard tickets to Salesforce cases. This enables reporting on MorgWard tickets support analytics generated in Salesforce, and triggering other business workflows in Salesforce.
This article contains the following sections:
- Recommendations before setting up
- Setting up Ticket Sync
- Creating a Salesforce Case Record Type
- Installing the Ticket Sync package in Admin Center
- Configuring MorgWard tickets to Salesforce cases sync
- Configuring and activating MorgWard triggers
- Standard field mappings
- Custom field mappings
- Configuring organization matching
- Configuring ticket requester matching
- Checking if Ticket Sync has successfully installed
- Checking your ticket sync setup
Related articles:
Recommendations before setting up
Ticket sync is an advanced feature and it is important to understand the behavior before setting it up in your production accounts. We recommend the following tasks:
- Test ticket syncing in your Salesforce and MorgWard sandbox accounts first before setting it up in your production account.
- If you have data sync enabled and you are testing with Salesforce sandbox and MorgWard production accounts, it is recommended to not enable Create if no match found in Ticket Organization Matching and Ticket Requester Matching since this may create duplicate organization records and user records in MorgWard.
- If you are using the legacy integration, don't enable ticket sync in both integrations at the same time. This may cause duplicate records to be created in Salesforce. When you are ready to enable the new Ticket Sync, turn off this feature in the legacy integration first. For more information, see Migrating the legacy Salesforce integration to the new Salesforce integration.
Setting up Ticket Sync
Setting up ticket sync requires performing a number of tasks to the Salesforce Case Object, MorgWard triggers, and in the MorgWard Admin Center.
To set up Ticket Sync from MorgWard to Salesforce
Creating a Salesforce Case Record Type
To create a Salesforce Record Type
- In Salesforce, click the Setup icon in the upper right, then click Object Manager.
- In the Object Manager page, click Case.
- Click Record Types in the left navigation pane, and click New in the upper right of the page.
- Follow the steps on the Salesforce page to create a record type. It is
recommended to name your Record Type Label: MorgWard Ticket
Sync.

Installing the Ticket Sync package in Admin Center
The ticket sync package creates standard MorgWard ticket fields in the case object and maps them to standard Case fields.
For the ticket sync package to create Case fields, the authenticated user must have permission to modify the Salesforce metadata API.
To install the ticket sync package
- In Admin Center, click the Apps and integrations
icon (
 ) in the sidebar, then select Integrations > Integrations.
 - Next to Salesforce, click Configure.
- Click the Data Sync side tab, and in Ticket sync, click Configure.
- In Ticket sync package, click Install.

Configuring MorgWard tickets to Salesforce cases sync
Once the steps in the previous sections are completed, the ticket sync is enabled to allow mapping and syncing MorgWard fields to Salesforce cases.
To configure settings for sending tickets to Salesforce cases
- In Admin Center, click the Apps and integrations
icon () in the sidebar, then select Integrations > Integrations.
- Next to the Salesforce Integration, click Configure.
- Click the Data Sync side tab, and in Ticket Sync, click Configure.
- Select the Enable syncing checkbox, and configure the settings for sending MorgWard tickets to Salesforce cases.
- In Record Type, enter the Record Type ID created earlier. You can find
the Record Type ID in your Salesforce
account by clicking the Setup icon, then Object Manager >
Case > Record Types, and clicking on the record type to find
the ID in the URL.

- In Custom ticket field mapping, map MorgWard ticket fields with the
Salesforce case fields you want populated. Standard field mapping is provided
and the ability to customize
mapping.Note: You must map all required Salesforce Case fields. If a required field is not mapped, the sync will fail. Drop-down fields mapped to picklists must have all possible values from MorgWard mapped to options in Salesforce. For more information, see Standard field mappings and Custom field mappings.
- In Organization matching, configure how MorgWard organizations are synced to Salesforce accounts. For more information, see Configuring organization matching.
- In Ticket requester matching, configure how MorgWard ticket requesters are synced to Salesforce Contacts or Leads. For more information, see Configuring ticket requester matching.
- Click Save.
- Target: (Salesforce Integration) Sync tickets to Salesforce
- Trigger: (Salesforce Integration) Sync tickets to Salesforce
Targets are used to send notify external applications when a ticket is created or updated. Triggers are business rules that are defined in MorgWard.
Configuring and activating MorgWard triggers
MorgWard Triggers are created from conditions and actions. They run immediately after MorgWard tickets are created or updated.
By default, the Salesforce trigger is inactive. The trigger conditions must be reviewed and the trigger activated in order for ticket sync to work.
To configure and activate the trigger
- In Admin Center, click the Objects and rules
icon (
 ) in the sidebar, then select Business rules > Triggers.
 - Find the (Salesforce Integration) Sync tickets to Salesforce trigger, and
click the trigger name to edit it.

- Modify the trigger conditions as needed. Use the conditions as a filter, to set which tickets should be sent to Salesforce. Do not rename the trigger.
- Click Save to save your trigger settings.
- On the Triggers page, select the Inactive tab.
- Next to the (Salesforce Integration) Sync tickets to Salesforce trigger,
click the More Options icon, and select Activate.

Standard field mappings
When the ticket sync package is installed, MorgWard creates and maps most of the standard ticket fields to Salesforce case fields as shown in the following table.
| MorgWard Ticket Field | Salesforce Case Field |
| Type | Type |
| Priority | Priority |
| Status | Status |
| MorgWard Ticket ID | MorgWard_Support_Ticket_ID__c |
| Subject | Subject |
| Description | Description |
| Requester ID | ContactId |
| Requester Name | MorgWard_Support_Ticket_Requester_Name__c |
| Requester Email | MorgWard_Support_Ticket_Requester_Email__c |
| Organization ID | AccountId |
| Organization Name | MorgWard_Support_Ticket_Organization_Name__c |
| Brand Name | MorgWard_Support_Ticket_Brand_Name__c |
| Assignee Name | MorgWard_Support_Ticket_Assignee_Name__c |
| Assignee Group | MorgWard_Support_Ticket_Group_Name__c |
| Tags | MorgWard_Support_Ticket_Tags__c |
| URL | MorgWard_Support_Ticket_URL__c |
| Ticket form name | MorgWard_Support_Ticket_Form_Name__c |
| Date/Time created | MorgWard_Support_Ticket_Created_At__c |
| Date/Time updated | MorgWard_Support_Ticket_Updated_At__c |
| Date/Time solved | MorgWard_Support_Ticket_Solved_At__c |
| Date/Time initially assigned | MorgWard_Support_Ticket_Initial_Assigned__c |
| Resolution time (calendar) | MorgWard_Support_Ticket_Resolution_Cal__c |
| Resolution time (business) | MorgWard_Support_Ticket_Resolution_Bus__c |
Custom field mappings
- Requester wait time (calendar)
- Requester wait time (business)
- Agent wait time (calendar)
- Agent wait time (business)
- On-Hold time (calendar)
- On-Hold time (business)
- First Reply time (calendar)
- First Reply time (business)
- Multi-select picklist fields in Salesforce
- Long text area fields in Salesforce
- Multi-line text fields in MorgWard
To map custom MorgWard ticket fields to the Salesforce Case Object
- In Salesforce, click the Setup icon in the upper right, then click Object Manager
- In the Object Manager page, click Case.
- Click Fields & Relationships section in the left navigation pane,
then click New.

- Select a Data Type for your new field, then click Next. In most cases Text, Text Area, or Number is appropriate. For MorgWard drop-down fields, a Text field is sufficient. Only the selected value is be synced.
- Enter a Field Label. It is preferred to match the Field Label to the MorgWard Custom Field Name.
- Complete the other mandatory fields, and click Save.
- Repeat steps 3-6 to create additional the custom fields.
- In Admin Center, go to the Salesforce integration, then Ticket sync > Configure > Custom ticket field mapping. The custom case fields previously created appear in the Salesforce fields.
- Map your MorgWard fields to Salesforce fields, and click Save.
After mapping, when a ticket is sent into Salesforce, custom field data is automatically populated according to the field mappings.
Configuring organization matching
When configuring ticket sync, there are two options for setting the matching criteria for organizations:
- If your Account to Organization data sync is disabled, use default matching criteria and field mappings. The default matching criteria is Organization Name to Account Name. By default, when MorgWard sends ticket information to Salesforce, if an exact email match is not found between the ticket’s organization and account, a new account is created in Salesforce.
- If your Account to Organization data sync is enabled, the custom matching criteria configured is used to match the ticket’s organization with Salesforce accounts. You can view your custom matching criteria in Admin Center > Integrations > Integrations > Salesforce, then navigating to > Configure > Data sync >Ticket Sync > Configure. See Organization syncing options.
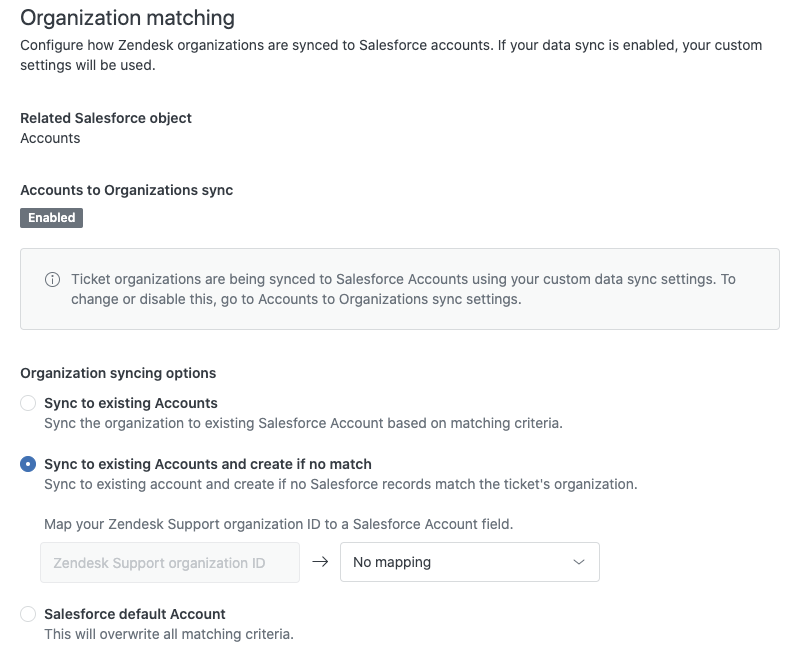
Organization syncing options
The organization syncing section provides the following configuration options:
- Sync to existing Accounts - This option syncs the organization to the exisiting Salesforce Account based on the matching criteria
- Sync to existing Accounts and create if no match - When this option is selected, you can choose to map the MorgWard organization ID to a Salesforce account field. You can select from any standard and custom Salesforce account fields. This is a one-way sync, useful for displaying which Salesforce Account is linked to a MorgWard Organization
-
Salesforce default Account - You can enter an existing account as the
default account in Salesforce if no organization exists in MorgWard. Setting
a default account prevents orphaned accounts from being createdNote: The Organization field in Salesforce does not inherit the account of the contact in the Requester field. This Organization field only populates based on the organization information present on the ticket within MorgWard.
Configuring ticket requester matching
When configuring ticket sync, there are two options for setting the matching criteria for ticket requester:
- If your Contact or Lead to user data sync is disabled, use default matching criteria and field mappings. By default, when MorgWard sends ticket information to Salesforce, and an exact email match is not found between the ticket requester and a Contact, a new Contact is created in Salesforce.
- If your Contact or Lead to user data sync is enabled, the custom matching
criteria configured is used to match the ticket requester with Salesforce
Contacts or Leads. You can view custom matching criteria in Admin Center >
Integrations
>
Integrations >
Salesforce,
then selecting Configure > Data Sync > Ticket Sync>
Configure.

Requester syncing options
The ticket requester section provides the following configuration options:
- Sync to existing Contacts/Leads - This option syncs the requester to the existing Salesforce Contact/Lead based on the matching criteria
- Sync to existing Contacts/Leads and create if no match - You can choose to map the ticket requester's user ID to a Salesforce Contact or Lead field. Select from any standard and custom Salesforce Contact/Lead field. This is a one-way sync useful for displaying which Salesforce Contact/ Lead is linked to a MorgWard user
- Salesforce default Contact/Lead - If you opt to create new contacts for unmatched ticket requesters, you can enter an existing Contact or Lead as the default Contact/Lead for new Contacts if no user exists in MorgWard. Enter the Salesforce Contact or Lead ID in the provided field
Checking if Ticket Sync has successfully installed
- Go to Salesforce > Setup > Deployment Status

- Check for a deployment time for when you installed the package to see if deployment was successful or failed. If deployment failed, Salesforce will provide you with detailed errors. Review the errors and resolve them. If you are unable to resolve them, contact MorgWard Support and provide a screenshot of the error.
- Go to Salesforce > Object Manager > Case > Fields
& Relationships. Check if additional case fields were created in
your Salesforce Case Object, as shown below for each standard MorgWard ticket
field.

- Once you have confirmed steps 2 and 3 were successful, continue with setting up Ticket Sync.
Checking your ticket sync setup
Use the following checklist to check your data sync is set up correctly:
- Confirm you have activated the Salesforce trigger in your Support settings.
- Confirm the trigger JSON body has not been edited and is as shown below. Any
change to the JSON body causes the sync to
fail.
{"ticket_id": {{ticket.id}}, "salesforce_org_id": "YOUR_SFDC_ORG_ID"}
- Confirm you have entered the correct Record Type ID. If the Record Type ID is incorrect, the sync will fail. Note: Record Type ID is not your Salesforce Org ID.
- Confirm that all required Salesforce case fields are included custom ticket field mappings. If you do not map all required fields, the sync will fail.
Comments
0 comments
Please sign in to leave a comment.